How to layer a terrarium represents one of the most common questions newcomers encounter when starting their miniature ecosystem journey. The fascination with creating these glass-enclosed worlds often begins with admiration for their beauty, but success depends entirely on understanding the foundation beneath those thriving plants.
During my six years of terrarium building, I’ve discovered that proper layering transforms what appears to be simple decorative gardening into genuine ecosystem architecture. Each layer serves a critical purpose, much like the careful construction methods beavers use when building their engineered dams—every component must work in harmony with the others.
How to layer a terrarium?
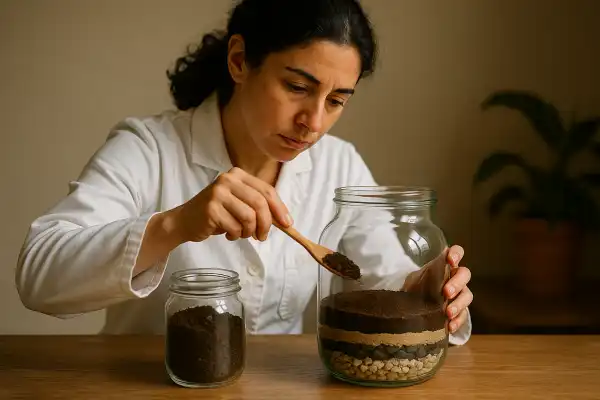
Terrarium layering follows a specific bottom-to-top sequence: drainage layer, barrier layer, activated charcoal layer, substrate layer, and decorative elements. This systematic approach creates a self-sustaining environment where water cycles properly and plants can establish healthy root systems without the risk of waterlogging or root rot.
The foundation: drainage layer
The drainage layer should measure approximately half an inch thick for smaller containers, with depths of 1-2 inches for standard terrarium sizes, and up to 2.5-3 inches for larger enclosures. This bottom foundation prevents water from pooling around plant roots, which would otherwise lead to devastating root rot.
LECA (Lightweight Expandable Clay Aggregate) represents the superior choice for drainage material due to its lightweight properties, water absorption capabilities, and resistance to physical pressure. These clay balls absorb excess moisture while maintaining airflow, creating an ideal reservoir system that wicks water back up to plant roots when needed.
Alternative materials include river pebbles, aquarium gravel, or volcanic scoria stones. However, these options are significantly heavier and may stress glass containers over time. When using any drainage material, rinse thoroughly before placement to remove dust particles that could cloud your terrarium’s clarity.
Creating separation: barrier layer
The barrier layer prevents substrate from mixing with the drainage layer, maintaining proper water movement and preventing clogs. Without this separation, soil particles will eventually infiltrate the drainage space, rendering it ineffective.
Carbon fiber mesh, cut to fit your container’s dimensions, provides the most durable barrier option. Window screen replacement material from hardware stores works equally well and costs significantly less than specialized terrarium mesh. For budget-conscious builders, coffee filters or fine garden netting serve as temporary alternatives, though they degrade over time in humid environments.
Position the barrier carefully to cover the entire drainage layer surface. The mesh should lay flat without creating pockets where soil could accumulate. Overlapping edges slightly ensures complete coverage without gaps.
Filtration through activated charcoal
Activated charcoal serves as the filtration system, absorbing impurities, preventing bacterial growth, and eliminating odors that develop in closed terrarium environments. This layer proves especially critical in sealed terrariums where air circulation is limited.
Apply activated charcoal in a thin, even layer—just enough to lightly cover the barrier mesh. Activated charcoal is available in granule or powder forms, with granules being less messy during application. Horticultural charcoal from garden centers provides the best results, though chemical-free barbecue charcoal broken into small pieces works as an emergency substitute.
The charcoal layer requires minimal thickness because its surface area, not volume, provides the filtration benefit. Excessive charcoal depth wastes valuable growing space without improving filtration efficiency.
Optional moisture regulation: sphagnum moss layer
Sphagnum moss can absorb up to 20 times its dry weight in water while providing antibacterial properties and pH regulation beneficial for acid-loving plants. This natural material creates an additional barrier while contributing to consistent humidity levels.
Soak sphagnum moss for one minute, squeeze out excess moisture, then distribute a thin layer over the charcoal. The moss should be thick enough to prevent soil from washing through to lower layers while remaining thin enough to avoid consuming excessive container space.
Fresh sphagnum moss appears green and may continue growing in terrarium conditions, potentially creating unwanted visual growth up container walls. Dried sphagnum moss eliminates this concern while providing all functional benefits.
Growing medium: substrate layer
Substrate thickness must accommodate the largest root ball while providing room for growth, typically requiring 2-4 inches depending on plant selection. This layer provides structural support, nutrition, and the growing environment where your plants will establish their root systems.
Successful terrarium substrates achieve the correct balance of water retention, drainage, aeration, and plant support through soil-less, light, and fluffy mixtures. Commercial terrarium mixes or ABG (Atlanta Botanical Garden) substrate provide professionally formulated options that eliminate guesswork.
For custom mixing, combine coconut coir, perlite, and orchid bark in equal proportions. Coconut coir provides excellent water retention while maintaining drainage and aeration properties ideal for terrarium environments. Avoid heavy potting soils that compact easily and retain excessive moisture in closed systems.
Create substrate depth variations by sloping the material from back to front. This technique adds visual dimension while providing different moisture zones for plants with varying water requirements. Taller areas toward the back accommodate larger plants, while shallower front sections work well for ground-covering species.
Structural elements: hardscape layer
Hardscape elements including rocks, driftwood, and decorative stones provide structural support, create visual depth, and offer additional planting surfaces for epiphytic plants. These non-living elements bridge the gap between substrate and living components.
Select hardscape materials proportional to your container size. Large stones in small terrariums overwhelm the space, while tiny pebbles disappear in spacious containers. Natural materials like dragon stone, lava rock, or weathered driftwood complement plant selections better than artificial decorations.
Position hardscape before planting to avoid disturbing established root systems. Embed larger pieces partially into the substrate for stability, ensuring they won’t shift when adding plants or water. Leave adequate space between elements for plant placement and growth.
Final touches: decorative layer
Decorative top layers measuring 0.5-1 inch add aesthetic appeal while serving functional purposes including root protection, moisture retention, and soil stabilization. This finishing layer transforms practical growing medium into polished terrarium artistry.
Live moss creates dynamic, evolving surfaces in closed terrariums where humidity supports growth. Sheet moss, cushion moss, or locally collected varieties establish quickly and spread naturally over time. In open terrariums, dried moss maintains appearance without requiring constant moisture.
Decorative sand, bark chips, or colored stones provide static alternatives that won’t change over time. Multiple thin sand layers in different colors create striking geological effects reminiscent of natural rock formations. Ensure any decorative materials are aquarium-safe and won’t release harmful chemicals in humid conditions.
Pro tips for layering success
Measure total layer depth before beginning construction. Combined layers should occupy one-quarter to one-third of total container height, leaving adequate space for plant growth and visual proportion. Mark your container at the appropriate soil level to avoid overfilling.
Work slowly and deliberately when adding each layer. Use funnels made from rolled paper to direct materials precisely where needed, especially in narrow-necked containers. Gentle tamping with bamboo skewers or terrarium tools settles layers without excessive compaction.
Clean container walls between layers using soft brushes or microfiber cloths. Soil smudges on glass detract from the finished appearance and become increasingly difficult to remove once moisture is added. Take time for cleaning during construction rather than struggling with access limitations later.
Consider your watering method when finalizing layer depths. Terrariums requiring frequent watering benefit from deeper drainage layers, while sealed systems needing minimal water additions can allocate more space to growing medium. Adjust proportions based on your specific plant selections and maintenance preferences.
Conclusion
Last weekend, when I layered my newest closed terrarium featuring native Mexican ferns, the methodical process reminded me why proper foundation work makes all the difference in ecosystem success. Each carefully measured layer creates the infrastructure these miniature worlds need to thrive for years rather than months. Understanding how to layer a terrarium properly transforms beginners into confident ecosystem architects, capable of creating thriving miniature worlds that bring nature’s beauty into any space.
This guide represents my ongoing research and hands-on experience building hundreds of terrariums over six years. The techniques described here have proven successful in my work developing sustainable mini-ecosystems for plant enthusiasts across all skill levels.